Wednesday, June 20, 2012

Combating groundhogs

Digging Prevention
After a few days of "groundhog induced depression" I began planning how to reconstruct the garden to effectively keep out groundhogs. I now knew from experience that they can easily dig under a fence and I also learned that they can climb fences. As I was watching one ground hog pulling collard leaves off the plant I could see another one sitting on top of the five foot wooden fence that surrounds our backyard. There are videos of ground hogs on top of twelve foot fences.

Climbing Prevention
I looked through a number of different websites (most of which can be found on www.ourediblegarden.org under gardening, challenges, pests) and determined that fencing was my best option. But it had to be done correctly. Since ground hogs can dig under fences it is necessary to put a barrier on or under the soil at the base of the fence.  That is what is shown in the photo to the left. I used two foot chicken wire laid flat on the ground. I first raked as much of the mulch and soil as I could off the path and rolled out the chicken wire.

Then I began putting in 3 foot metal fence posts about every five feet. The posts were five or six inches from the edge of the chicken wire.
These posts have a 3-4 inch stabilizer that needs to be pounded into the ground and so it was necessary to cut away some of the wire around where the post was going to go so that the stabilizer didn't "hang up" on the wire as it was pounded in. I found it useful to take a two foot piece of rebar and pound it in where I wanted the post to go to make sure that I wasn't going to encounter shale. If the rebar went down as far as the post needed to go I knew it was okay to pound in the post. I used a level to make sure each post was as vertical as possible.

The next step was to add the four foot vertical chicken wire, attached to the posts. Four foot fencing on three foot posts was intentional. Groundhogs are good climbers. But they don't like wobbly fences. The top foot of the chicken wire is not connected to anything and it tends to flop backwards toward the path. It is secured to the post near the top with zip ties so that it can't easily be pulled off the post by a ten pound ball of climbing fur.

The next step was to crawl around the fence and connect with vertical chicken wire to the horizontal chicken wire with zip ties every six to nine inches so that the fencing effectively becomes one piece.  The final step was to pull soil and mulch over the chicken wire on the ground so that the wire was covered.

There is only one entrance to the three garden beds that are enclosed in the fencing. It is where the black pot is in the photo. I slid a piece of plexiglass on the inside of the fencing using rebar to keep it close to the two fence posts and I slid an old bike route metal sign (gathered some years ago from Onondaga Creek during a clean-up) on the outside, again using rebar to keep it close to the other side of the two fence posts. Presumably ground hogs cannot climb up either of these surfaces.

The only potential weakness I see is that around the opening and at the corners the fencing is taut and could be climbed. At the top the animal would then have to jump into the garden. I plan to add a few aluminum pie plates in these areas because apparently things that move frighten ground hogs.

Nothing is more disheartening than animals eating our food.

We had seen a groundhog in the back yard from time to time. It had been living under our rain barrels at some time because when I finally got around to leveling the slightly tilted rain barrel there was a huge hole underneath it. Too large to be from the rain overflow when the barrel was full. Plus the soil was pushed up against the wood fence, not something that water would do. I filled in the hole but a couple of days later it was there again. Ground hog, I concluded. I called the trapper and he set a trap on either side of the hole. No success. I filled in the hole again and put wire fencing on the ground over the area.

Having learned previously what ground hogs like, I planted our greens (collards, kale and some Asian greens) along with parsley, peas and pole beans inside a fenced area. The ground hog was still seen in the yard outside the fence. I believed my greens, etc., were relatively safe although I knew that ground hogs could dig under fences. This fencing only extended a few  inches below soil level. The fencing was three foot rabbit fencing.
Dinosaur Kale

I haven't studied ground hog psychology but it seems to me that it didn't attack my garden until I ticked it off by adding wire fencing around the bottom of one side of the wooden fencing that runs around our back yard. As soon as I did this the ground hog (or hogs as the case seems to be) went under or over my fence and laid waste to the kale, collards, and parsley and started on the beans and peas. The dinosaur kale, seen here, was wiped out because not only the leaves but the growing centers were eaten. This was not true of the white Russian kale (below) either because they didn't find that so tasty or were interrupted before they could clean that out.
White Russian Kale
Not only were some of the leaves left but the plants have their growing points intact.
The parsley was also chewed down but looks like it too will grow back.

I had two trellises of pole beans. I put a circle of fencing around one of the trellises. Next morning the beans that were not protected were eaten.

In the fenced area I have a wooden frame with screen covers. The purpose was to grow Asian greens inside protected from flea beetles. One of the two screens had been pushed aside and a few of the greens eaten.

It is hard to explain how annoying/irritating/depressing it is to find plants that were growing nicely and producing daily meals of greens devastated overnight. I just felt helpless. There is a fence around the yard. There is a fenced in garden area. I was working on making the wooden fence more secure. I was outwitted by a fat little (at 10 pounds probably not so little) rodent. And it didn't even share nicely.

Another loss in the fenced-in garden was some of the soybeans. They had been recently planted and were just emerging and were under the rectangle of hardware cloth that is seen in this photo. The covering was not nailed down and the groundhog just pushed under the edge of it and ate about half of the seedlings.

 The groundhog(s) apparently entered the fenced area from the path to the right as there were three or four places where the soil had been moved and there were also bits of fur on the path, perhaps from a hasty retreat when I saw them and came screaming into the back yard. I wanted more than just fur!


Monday, May 21, 2012

Grapes and Vermicompost

Growing grapes has been one of my recent new things. We had a good harvest last year, somewhat surprising since I have been blundering along in terms of pruning, one of the essentials of grape growing.
This year I am trying to observe how they grow so that I have a better idea of what to do at the end of next winter (and also during the year as the grapes vines spread all over the trellis).
At the end of winter I cut back last year's growth leaving about four buds on each of the many spurs and removing the rest. What I noticed yesterday (May 20th) was that each bud has grown out to about 4 "nodes", although I assume they will continue growing longer. At each node (except the first one) there is a leaf and opposite the leaf is what I expect will become the bunch of grapes. This projection has short side branches with little blobs at the end of each. In the axil of the leaf is another small (currently, at least) leaf. This photo is typical. The grapes are closest to the camera and the large leaf, with the little leaf in its axil, is on the opposite side of the vine.
The first node of the vine (and sometimes more) does not have the bunch of grapes branch, but just the leaf with a little leaf in the axil.

We started a new bed of raspberries three years ago and although all three new plants were supposed to be the same it became obvious that one was different. It had thorns and did not develop raspberries in July when the other two did. I began cutting it as if it were an early fruiting variety. It produced early raspberries last year and it is now (May 20th) beginning to flower while the others are still growing taller. In terms of pruning I have always cut our raspberries to the ground in the fall. But the early fruiting one produces berries on the previous year's growth, so that one is cut back to about three feet and berries are produced on the new growth off those three foot stems.

For years we have had composting worms in bins in our cellar from which I periodically harvest vermicompost. This ends up somewhere in the vegetable garden but I have never kept records of what effect, if any, it has on our vegetable production. It is supposed to be very nutritious for plants.
This year I mixed some of the vermicompost with compost from the OCRRA site and applied it to part of the pepper bed. In this photo there are twelve plants of three different pepper varieties. From the right of the photo they are garden sunshine, bullnose, and pepper king. Somewhat unscientifically I applied the vermicompost to the right side of the  bed so that all of the garden sunshine and six of the bullnose plants are affected. But all of the pepper kings and half of the bullnose just have regular OCRRA compost. The pepper kings are also spaced a little bit farther apart than the others. Later I will try to determine whether there is any difference in the growth or production of the plants. [This photo is taken looking west.]

Wednesday, April 11, 2012

It's a New Season


Nothing posted since November, but that happens in the winter.
The winter was not much of a winter and one of the results was that vegetables (like kale) that might overwinter didn't survive. Without a good snow cover they were subject to cold drying winds and freezing temperatures.
But I haven't been totally idle. Beyond making plans for what to grow this year I began starting seeds back on March 5th and 15th. Here are some of them out for a little "hardening off" before being planted.

The purpose of the screens (one was removed for the photograph) is to keep off cabbage white butterflies and their progeny - one of my nemeses last season.

Seeds are starting in the cellar, under lights, but there is other activity out in the garden. I did have some lettuce and a very small amount of spinach in cold frames. We have eaten two meals using lettuce so far. Most of my leeks and scallions survived the winter and we will be using some of them soon. The garlic is coming along nicely.

With the perennials, there are signs of rhubarb and some raspberries starting. The other day, while on my hands and knees pulling weeds (which survived the winter very well), I noticed the beginnings of asparagus. Now they will wait until we get some warm weather at which time they will shoot up. This is their 3rd year so we should get a few weeks of picking. Last year we only picked from May 2nd to May 8th for a total of 1 1/2 to 2 pounds.

Other early season activities included pruning the Concord grapes (I'm hopeful I did it right) and restoring fencing around part of the vegetable garden with the hope of keeping any neighborhood groundhogs away from the things they especially like.

Sunday, November 20, 2011

The garden at the end of the year

Not much is left in the garden. Quite a few leeks, a few scallions, next year's garlic, and some lettuce.
I tried something new this year with lettuce, which was to scatter lettuce seed inside the frame, which I did on October 12th. When the nights started approaching freezing I added the glass cover.
Today is November 20th and there are a few tiny seedlings inside the cold frame (see the photo below) and it will be interesting to see if they will survive the winter, be eaten by slugs (I don't think so this year), or die because they just aren't big enough to make it.

In past years I have started seedlings in the cold frame, generally with success. Those in the upper photo were transplanted earlier in the year and I have harvested some of the leaves since then. Once the snow falls they will just sit there waiting for spring weather when they will start growing again.

There are two other vegetables still in the garden - kale and beets. The kale was seriously eaten by cabbage white butterfly caterpillars (cabbage worms) but after I picked the worms off (about 30 of them) the kale has started to revive and may begin producing again in the spring. The kale is not protected from cold in any way but kale seems pretty hardy.

The beets aren't large enough to harvest and I don't know if they will start growing again in the spring. We will see.

I planted garlic on October 15th and have been surprised that I have seen no growth. I did plant somewhat deeply and I have had garlic not emerge until spring so I assume all is fine. I have now covered the garlic bed with straw.

Sunday, November 6, 2011

Index


It is hard to find topics that I know I have written something about. So here is an index to some of the topics in the past posts.

Brassicas and Cabbage Worms - 7-19-2011
Cold Frames - 4-42010, 3-10-2010, and 1-14-2010
Cover Crops - 4-6-2010 and 1-6-2009
Deer Fencing - 5-28-2010
Dinosaur Kale - 6-13-2011
Kale chips - 6-13-2011
Grapes - 8-27-2011
Lettuce - cold frame - 10-17-2010
Lettuce indoors - 2-1-2011 and 12-16-2010
Overwintered Crops - 4-4-2010
Pole bean trellis - 6-13-2011
Potatoes - 8-7-2011
Squash vine borers - 8-7-2011
Toads - 6-9-2010

Saturday, August 27, 2011

Grape Progress, or, not the Grapes of Wrath


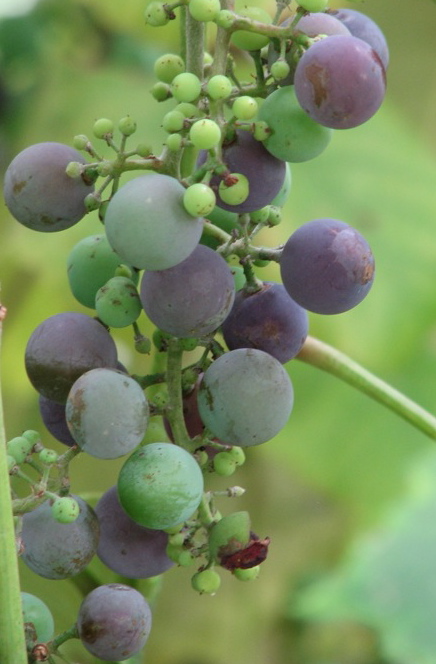
We planted two Concord grape vines two years ago. I have been bumbling along not sure how to take care of them - when to prune, what to prune, how much to prune, when to let the bunches grow, how many to let grow. This spring I built an arbor for them to grow on but the top of the arbor was a little higher than the wire on which they had been growing, so none of the bunches of grapes are hanging down from the arbor. They are, instead, hanging from last year's vines that were attached to the wires. I pulled the wire up closer to the top of the arbor and the new growth is mostly up there.

The vines produced lots of little bunches of grapes and I was pretty sure that there were far more than the two plants could sustain. I had read that I should let a small number of bunches grow this third year. I removed those that looked particularly sparse but I let most of them keep growing. They did, although only about half of the grapes in many bunches actually filled out. They started turning purple a while ago and when I walked under the trellis several days ago, I could smell grapes.

Since I have been making jam this week - peach, pear (more about that in a later post) and blackberry - I decided to see if I could collect enough grapes to make grape jam. Th
e recipe calls for 5 pounds of grapes (including stems). I began picking those individual grapes that looked ripe (nice dark purple color - none in this photo have reached that color) instead of picking them by the bunch. That would have sacrificed a lot of unripe grapes. I had a little over two pounds when I weighed the first picking. So I picked some more and then some more, eventually picking all of those I saw that looked ripe and ended up with 4.91 pounds. This turned out to be a little more than I needed so I will amend the recipe to call for 4+ pounds of actual grapes instead of 5 pounds of grapes including stems.

When the jam was finished there was a small amount that didn't fit into the seven 12 ounce jars. When it cooled a taste test showed that it actually was grape jam. So, despite my misgivings and with a lot of room for improvement, we had a successful grape harvest. I think that next year's fruiting canes are mostly up on top of the arbor. I hope that by limiting the number of bunches they will fill out better and look like the Concord grape bunches at the Regional Market. That would also mean bigger grapes. But I am happy with the result this year. And there are still grapes to be picked.